In these days, CSRF tokens are more and more prevalent in Web applications. As a consequence, managing tokens within an intercepting proxy is a very common task for pentesters and bug hunters alike. From what I read online, most users of Burp Suite Pro tend to use Macros and Session handling rules as soon as CSRF tokens are involved, and that may be a pure waste of time and effort. We consider a narrow but common scenario where macros aren't needed: brute-forcing a CSRF-protected login form via Intruder.
First things first: we need a target. In order to allow readers to follow along at home, I selected an off-the-shelf vulnerable-by-design web app, DVWA (Damn Vulnerable Web Application) running on Docker. The following command 1) downloads the 'web-dvwa' container created by 'vulnerables' 2) runs it locally under the name 'dvwa' 3) accepts TTY interactions, like ^C 4) removes any modifications at shutdown.
$ docker run --rm -it --name dvwa vulnerables/web-dvwa
The output should contain the IP address affected to the container. In doubt, use 'docker inspect' to get it:
$ docker inspect dvwa --format='{{range .NetworkSettings.Networks}}{{.IPAddress}}{{end}}'
Supposing the container uses '172.17.0.3', we verify that the app is reachable:
$ curl -v http://172.17.0.3/
Got a 302 response with a redirect to login.php? All good! Time to finalize the configuration. In a browser going through Burp Suite, access setup.php, don't mind the frightening red messages, and simply click on the 'Create / Reset database' button at the bottom:
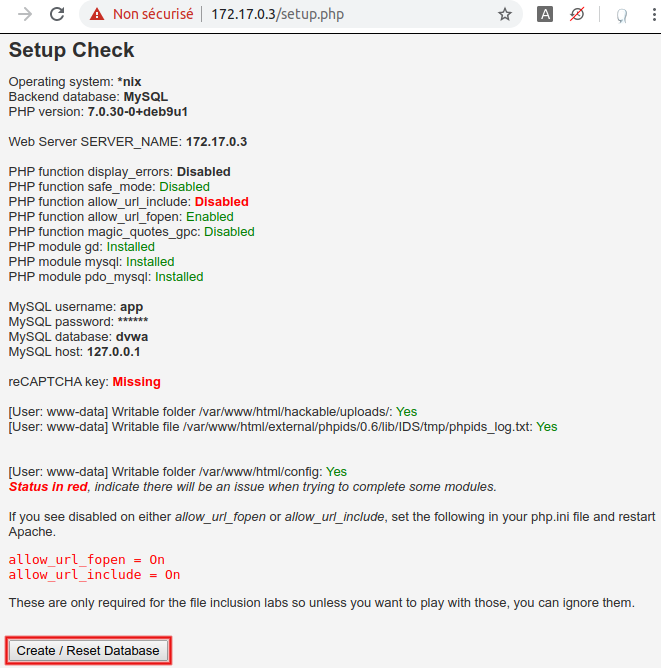
After successful completion (and a 5-second delay), you should be redirected to the login page. In order to be closer of a real-life scenario, we consider that we don't know what the password for user 'admin' is (in fact, it's simply 'password'). As a consequence, we also consider that we don't know what the workflow looks like for a successful connection.
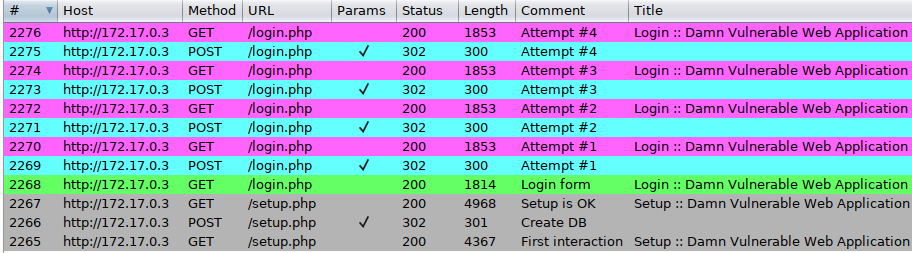
Submit a few invalid credentials (here four) and go to 'Proxy > HTTP history' (here sorted in reverse chronological order). Observe the calls for setup.php (grey, #2265 to #2267), then the initial GET request for login.php (green, #2268), followed by a recurring sequence appearing four times (one for each attempt, from #2269 to #2276):
- POST to login.php, with status code 302 and a redirect to itself (blue)
- GET to login.php, with status code 200 and a <div class="message"> tag containing 'Login failed' (purple)
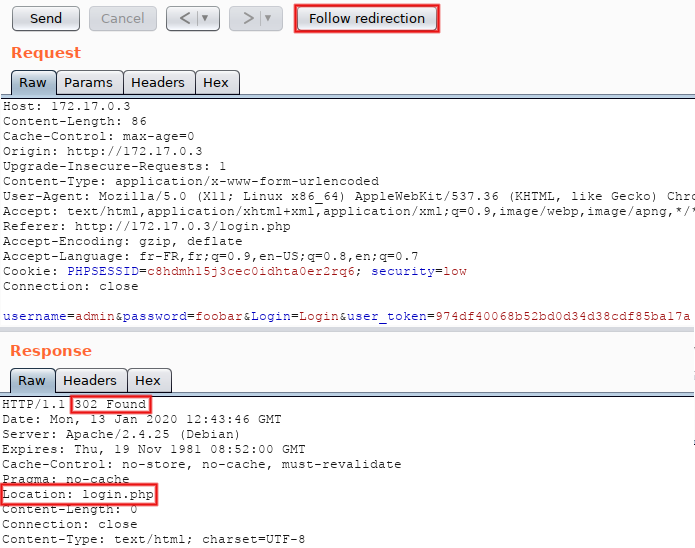
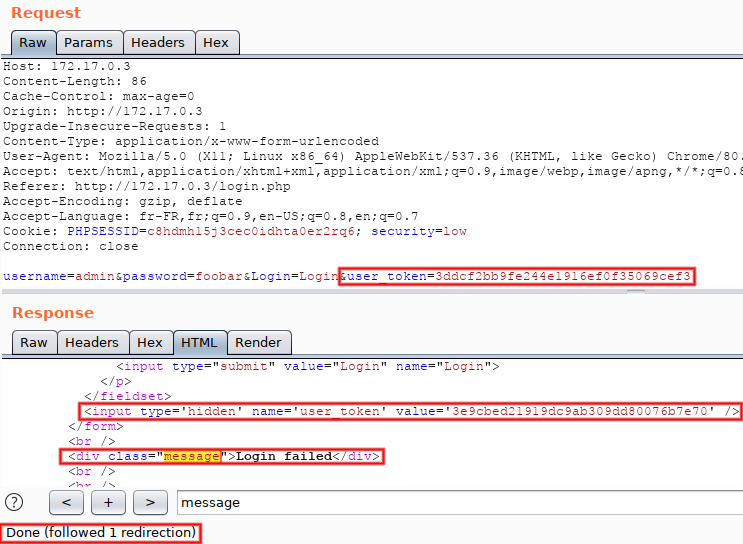
Every request (except the very first one) contains a 'PHPSESSID' session cookie, and the POST ones also contain an ever-changing CSRF parameter named 'user_token' and tied to the session. Pick one of the blue POST requests, send it to Repeater (Control+R) and switch to this tool (Control+Shift+R). Click on 'Send' (Control+G), the 302 response is displayed and a new 'Follow redirection' button appears on the top:
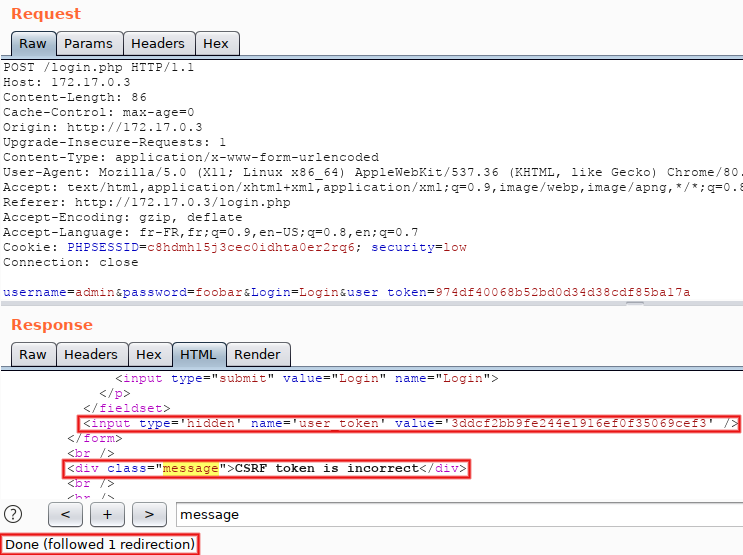
Next step, manual reuse of the fresh CSRF token: copy the value present in the response (the one starting with '3ddc'), put it in the request and re-submit. The message switchs to 'Login failed' and a new token (starting with '3e9c') is returned:
Hooray, we just manually dealt with CSRF tokens within Repeater! That's however way too inefficent for real-life situations. Let's do it in Intruder.
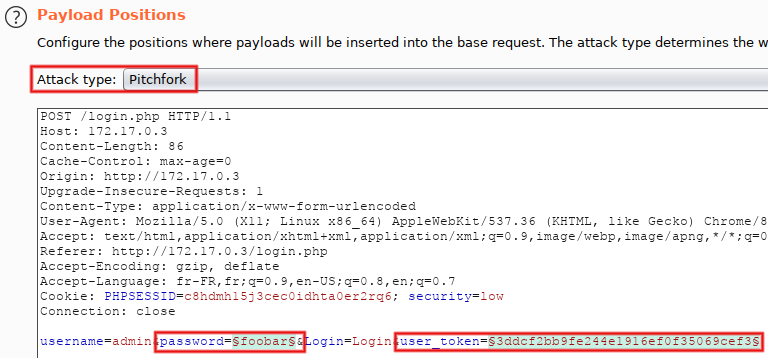
We'll now reuse the methodology used with Repeater in order to automagically manage tokens within Intruder, without macros. The plan: extract a fresh CSRF token from the last response (via the option 'Grep Extract') and re-use it for the next attempt (thanks to the payload type 'Recursive Grep'). Of course, a single thread must be used, in order to avoir race conditions (this is the case with macros too). Ready? From Repeater, send to Intruder (Control+I), then switch to its tab (Control+Shift+I). Go to 'Positions', remove all injection points except for 'password' and 'user_token'. Using the drop-down menu at the top, set 'Attack type' to 'Pitchfork':
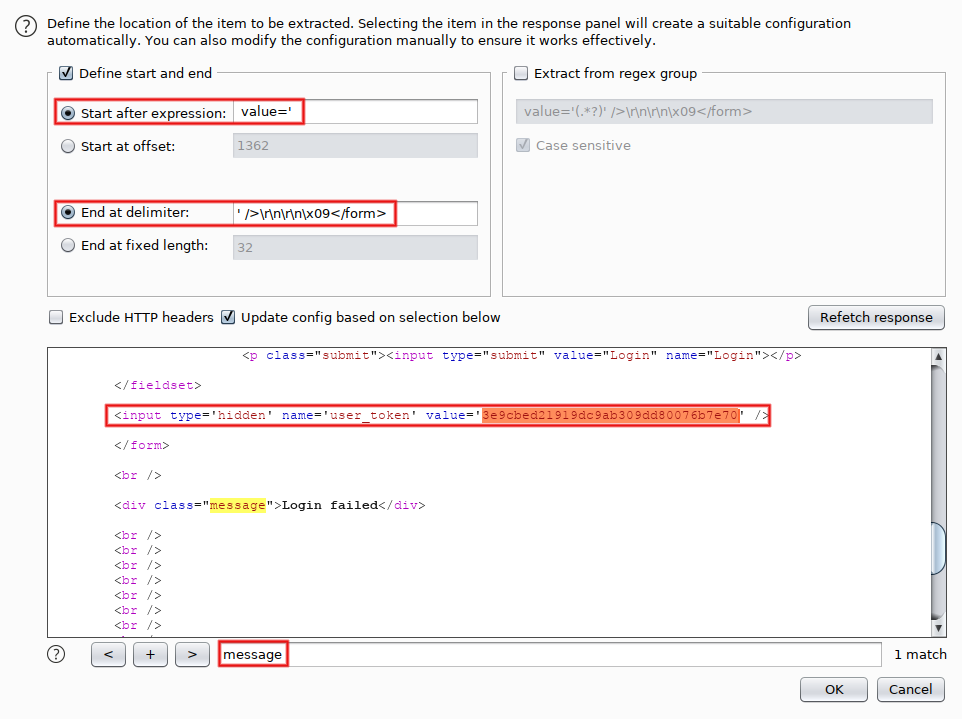
We'll come back to 'Payload set #2' in a minute. For the time being, go to 'Options' and add two 'Grep Extract' entries. The first one extracts the status message: click on 'Add', search for the 'message' div (Control+S) and highlight its content. That defines the 'Start after expression' and 'End at delimiter' fields. Click on 'OK':
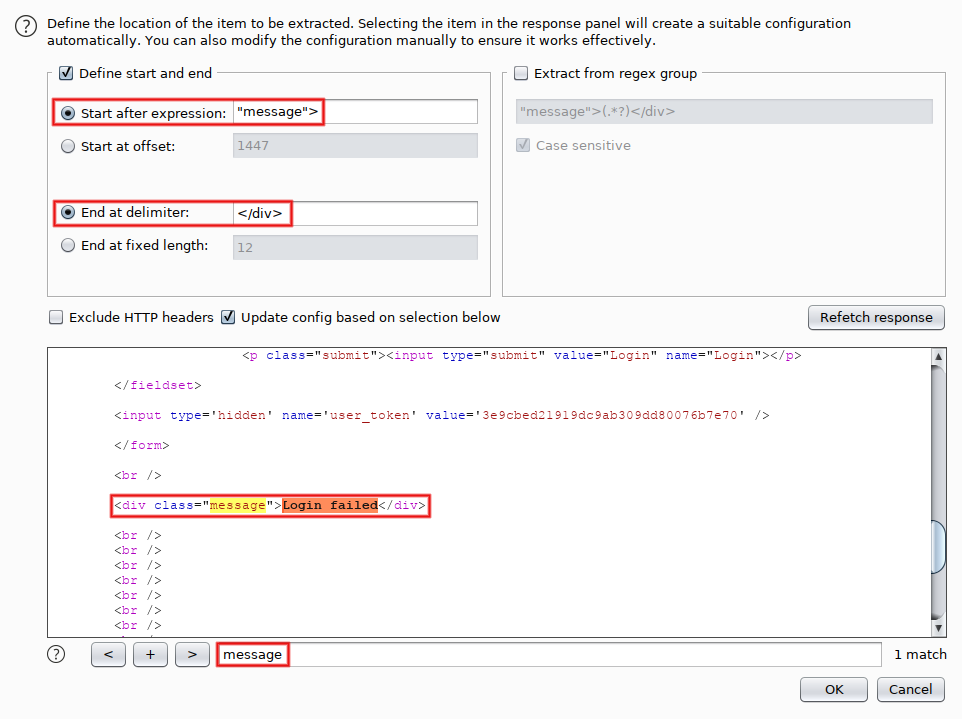
The second entry extracts the CSRF token: click on 'Add', search again for 'message' but now highlight the value of the hidden parameter 'user_token'. Be lazy, use a double-click (it works for every red or blue string). Check that the 'Start after expression' and 'End at delimiter' fields look good, then click on 'OK'. You may notice that the token displayed (starting with '3e9c') is the one we already saw in Repeater. That's expected, as we sent this exchange (request + response) from Repeater.
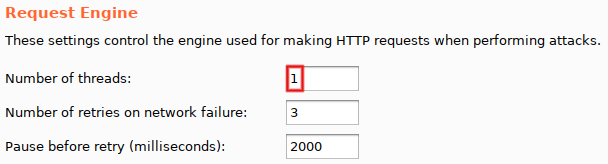
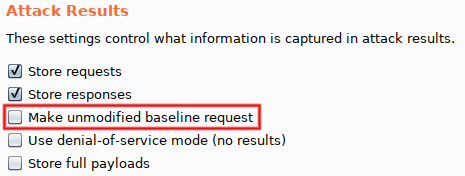
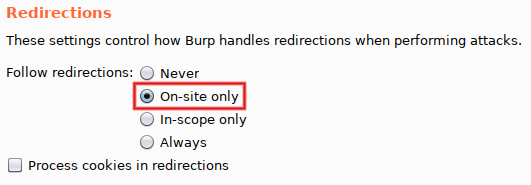
While we are in 'Options', a few other modifications are needed. From top to bottom: set 'Number of threads' to '1' (mandatory, avoid race conditions), uncheck 'Make unmodified baseline request' (optional, but I consider line #0 annoying) and select 'On-Site only' for 'Follow redirections' (mandatory, since we want to see the final response).
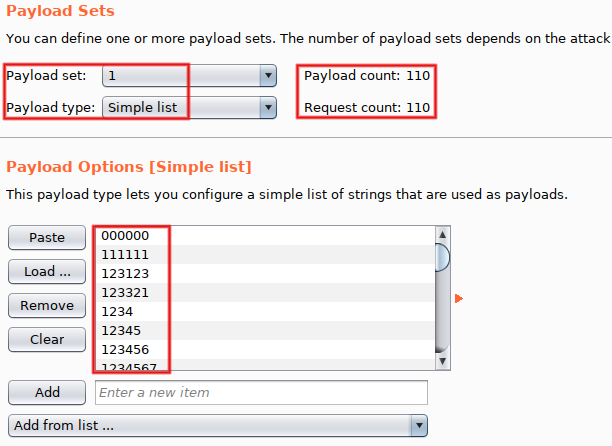
Time to configure the second payload. Go back to 'Payloads', and set 'Payload type' to 'Recursive Grep' for 'Payload set #2'. Select the second 'Grep Extract' entry (the one extracting CSRF tokens) and set 'Initial payload for first request' to the value 'INVALID_TOKEN':

Before running the attack, take a few seconds to consider its limitations:
- the attack is slow because only one thread is used, but this limitation is shared by most CSRF-related scenarios
- the first attempt uses an invalid token (the static value 'INVALID_TOKEN' we defined just above) and therefore is meaningless
- unsuccessful attempts have to be filtered out in order to reveal a possible success (typical of black-box scenarios)
- the response to a successful attempt may not contain a CSRF token, breaking our data-extraction logic
- the strategy can't used for other Burp Suite tools (ex: Scanner)
However, don't lose sight of its unique benefits:
- even if slow, the attack is twice faster than its macro-based counterpart (only one request per attempt, instead of two)
- no macros nor session handling rules to configure (for people who consider them frightening ;-)
- everything is visible by default (no need to load Logger++ or activate the session tracer)
Start the attack (Control+Space) and look at the top results. The first attempt is invalid, as expected. Subsequent ones properly reuse previously extracted tokens, as shown by the 'Login failed' message:

Using the filter on the top, remove everything matching 'Login failed'. Bingo, we found the admin's password!
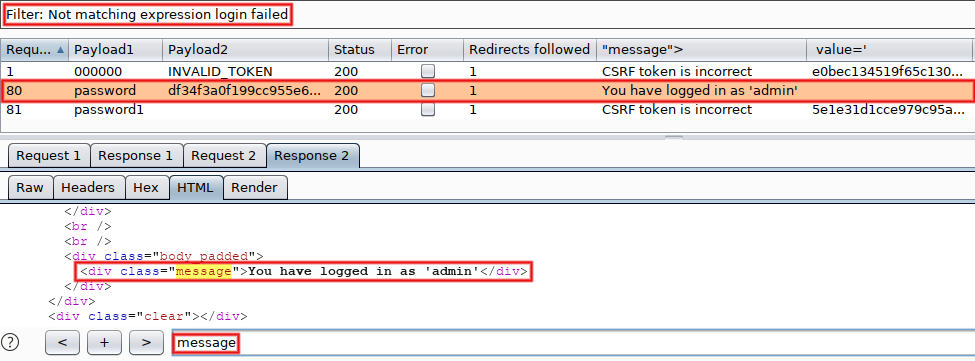
As previously supposed, the response to our successful attempt (line #80) doesn't contain a CSRF token (because its doesn't include a login form at all). That's why the next attempt (line #81) has an incorrect token. But we don't really care, as we already have the coveted password :-D If you managed to solve it on your side, congratulations! If you tried but didn't succeed on the first try, that's not a big deal. Clear your mind, pay attention to details, try to understand the 'why?' of each step then try again. If you didn't tried yet, please note that a working testbed is just a few commands away (install Docker + run the container).
I cover this subject (and many many others) in depth during my Burp Suite Pro trainings. For additional tips, watch this video produced by jr0ch17, a former student.
